机器学习第一步是特征选择
react-router源码分析
版本是master
示例
|
|
Router本身是一个react组件,这点也可以从源码中看出来
源码
Router Component
history用于取location,
state的match存储了一个有关当前pathname的对象,Router的children是Route,用于存储要渲染的Component,判断该Component是否渲染是在Route内判断的123456789101112131415161718192021222324252627282930313233343536373839404142434445464748495051525354555657585960616263646566676869707172737475767778798081828384import warning from 'warning'import invariant from 'invariant'import React from 'react'import PropTypes from 'prop-types'/** * The public API for putting history on context. */class Router extends React.Component { static propTypes = { history: PropTypes.object.isRequired, children: PropTypes.node } static contextTypes = { router: PropTypes.object } static childContextTypes = { router: PropTypes.object.isRequired } getChildContext() { return { router: { ...this.context.router, history: this.props.history, route: { location: this.props.history.location, match: this.state.match } } } } state = { match: this.computeMatch(this.props.history.location.pathname) } computeMatch(pathname) { return { path: '/', url: '/', params: {}, isExact: pathname === '/' } } componentWillMount() { const { children, history } = this.props invariant( children == null || React.Children.count(children) === 1, 'A <Router> may have only one child element' ) // Do this here so we can setState when a <Redirect> changes the // location in componentWillMount. This happens e.g. when doing // server rendering using a <StaticRouter>. this.unlisten = history.listen(() => { this.setState({ match: this.computeMatch(history.location.pathname) }) }) } componentWillReceiveProps(nextProps) { warning( this.props.history === nextProps.history, 'You cannot change <Router history>' ) } componentWillUnmount() { this.unlisten() } render() { const { children } = this.props return children ? React.Children.only(children) : null }}export default Router
Route Component
Route用于匹配一个路径并渲染Component
|
|
matchPath匹配路径
1、path-to-regexp把路径path转换成正则对象,并存储
2、正则匹配1234567891011121314151617181920212223242526272829303132333435363738394041424344454647484950515253545556575859import pathToRegexp from 'path-to-regexp'// var re = pathToRegexp('/foo/:bar', keys)// re = /^\/foo\/([^\/]+?)\/?$/iconst patternCache = {}const cacheLimit = 10000let cacheCount = 0const compilePath = (pattern, options) => { const cacheKey = `${options.end}${options.strict}` const cache = patternCache[cacheKey] || (patternCache[cacheKey] = {}) if (cache[pattern]) return cache[pattern] const keys = [] const re = pathToRegexp(pattern, keys, options) const compiledPattern = { re, keys } if (cacheCount < cacheLimit) { cache[pattern] = compiledPattern cacheCount++ } return compiledPattern}/** * Public API for matching a URL pathname to a path pattern. */const matchPath = (pathname, options = {}) => { if (typeof options === 'string') options = { path: options } const { path = '/', exact = false, strict = false } = options const { re, keys } = compilePath(path, { end: exact, strict }) // 匹配路径 const match = re.exec(pathname) if (!match) return null const [ url, ...values ] = match const isExact = pathname === url if (exact && !isExact) return null return { path, // the path pattern used to match url: path === '/' && url === '' ? '/' : url, // the matched portion of the URL isExact, // whether or not we matched exactly params: keys.reduce((memo, key, index) => { memo[key.name] = values[index] return memo }, {}) }}export default matchPath
其它
Prompt:用于页面跳转时的提示
Redirect:在组件内跳转location
StaticRouter:用于服务器端渲染
内存管理速成
机器学习-参数求解的三种方法
机器学习参数求解最常用的三种方法:最小二乘法,梯度下降法,最速牛顿法。
最小二乘法
用偏差平方和最小的原则拟合曲线,最小二乘法。
假设多项式为
求偏差平方和,即各已知点到这条曲线的距离之和
我们的目的是最小,对求偏导得
TensorBoard可视化学习
TensorBoard可视化是通过读取TensorFlow的事件文件来工作。TensorFlow 的事件文件包括了你会在 TensorFlow 运行中涉及到的主要数据。
创建TensorFlow图,选择节点输出数据
执行操作,汇总数据
合并操作
使用TensorFlow的softmax回归识别手写数字图片
MNIST数据集
数据集中每个数据单元由一张图片和一个对应标签组成。图片包含28*28个像素点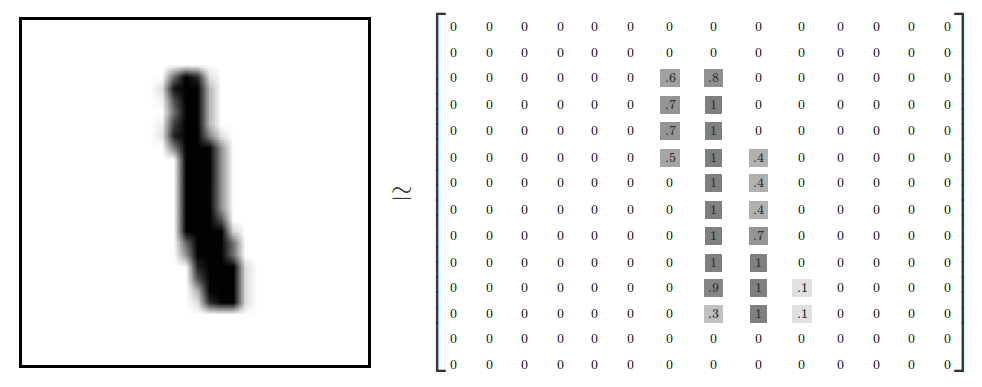
每个像素点的值介于0-1之间,
Softmax回归
Softmax回归是Logistic回归的推广,Logistic回归用于处理二分类问题,Softmax回归可以处理多分类问题。
Logistic函数(或称为Sigmoid函数)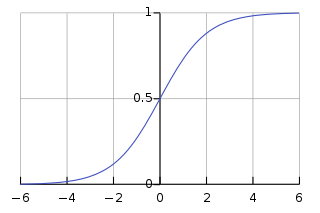
线性函数
代入g(z)
可推导
使用最大似然估计进行参数估计,假设所有样本独立同分布,
似然函数
对数似然函数
最大似然估计是求取最大值时的θ。可以使用梯度下降法求。
图片分类需要识别0-9,使用Softmax回归取得每个数字的概率。
神经网络基础
DNN,Deep Neural Networks,深度神经网络
对于人工智能的实现分为两派:一派是自顶向下通过逻辑和符号推导实现,另一类是自底向上通过模拟大脑中的神经网络实现。神经网络是第二派的实现。
神经网络由若干神经元组成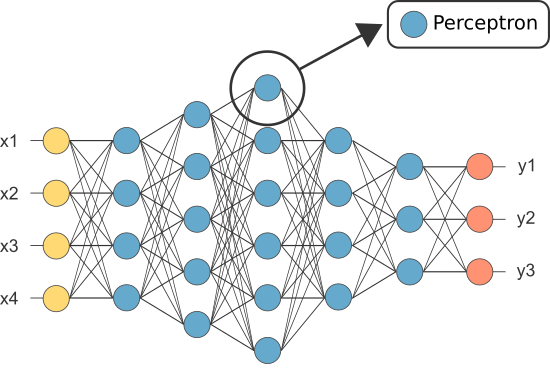
神经元
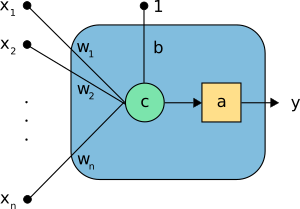
输入:x1,x2,…xn
权重:w1,w2,…wn
组合函数:c
激活函数:a
偏移:b
输出:y
感知机
神经元最早的起源于上世纪50-60年代,Frank Rosenblatt发明了一种叫感知机的神经元。感知机的输入输出是二进制0或1。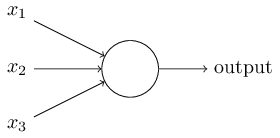
sigmoid神经元
在使用感知机构建神经网络时,神经元权重和偏移发生很小变化都可能导致输出的剧烈变化。所以引入了sigmoid神经元。sigmoid神经元的输入输出是浮点值。
感知机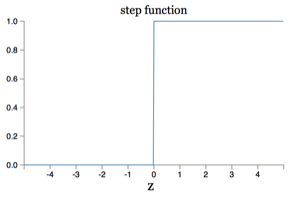
sigmoid神经元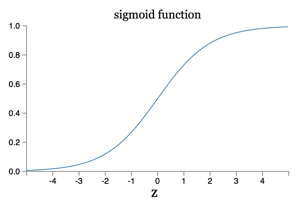
sigmoid神经元相当于平滑的感知机,意味着当权重和偏移变化时,输出按预期小幅度变化。
神经网络的结构
输入层–>隐层–>输出层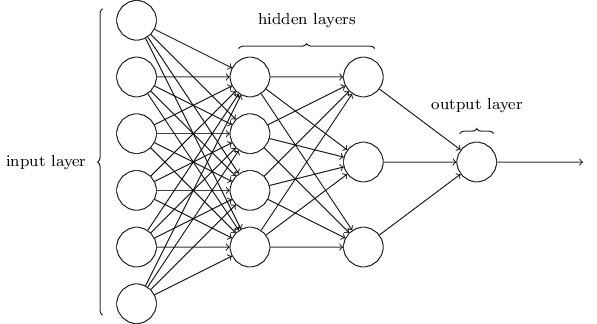
隐层的设计需要考虑层数和时间的平衡。
使用tf.contrib.learn快速搭建DNN识别鸢尾花
tf.contrib.learn是TensorFlow提供高级API。下面是使用DNN预测鸢尾花卉数据集的例子。
先分析下鸢尾花卉数据集,0/1/2分别代表Setosa,versicolor,virginica三个种类的花
| Sepal.Length(花萼长度) | Sepal.Width(花萼宽度) | Petal.Length(花瓣长度) | Petal.Width(花瓣宽度) | 种类 |
|---|---|---|---|---|
| 7.9 | 3.8 | 6.4 | 2.0 | 0/1/2 |
1、载入数据
2、构造神经网络分类器
3、利用训练数据拟合模型
4、评估模型的精确性
5、新的样本分类
|
|
输出12Accuracy: 0.966667Predictions: [1, 1]
TensorFlow基础使用
基础使用
TensorFlow几个要点
1、使用图graph来代表计算
2、在Sessions环境中执行图
3、使用tensors代表数据
4、使用Variables变量维护状态
5、使用feeds和fetches获取或写入操作
图的使用
构建下图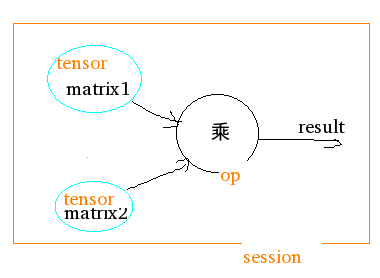
构建图
|
|
启动图
|
|
Sessions自动释放资源123with tf.Session() as sess: result = sess.run([product]) print(result)
在Python解释器中使用
在解释器中可以使用InteractiveSession class, Tensor.eval() ,Operation.run(),避免使用变量保存session1234567891011121314151617# Enter an interactive TensorFlow Session.import tensorflow as tfsess = tf.InteractiveSession()x = tf.Variable([1.0, 2.0])a = tf.constant([3.0, 3.0])# Initialize 'x' using the run() method of its initializer op.x.initializer.run()# Add an op to subtract 'a' from 'x'. Run it and print the resultsub = tf.sub(x, a)print(sub.eval())# ==> [-2. -1.]# Close the Session when we're done.sess.close()
Tensors
TensorFlow使用tensor数据结构表示所有数据,在不同操作之间只能传入tensor数据。tensor类似N维数组,一个tensor包括一个数据类型,一个rank(阶,张量的维数)和一个shape(形状,张量的维度)
| 阶 | 形状 | 维数 | 实例 |
|---|---|---|---|
| 0 | [] | 0-D | 纯量 s = 483 |
| 1 | [D0] | 1-D | 向量 v = [1.1, 2.2, 3.3] |
| 2 | [D0,D1] | 2-D | 矩阵 m = [[1, 2, 3], [4, 5, 6], [7, 8, 9]] |
| 3 | [D0,D1,D2] | 3-D | 3阶张量 t = [[[2], [4], [6]], [[8], [10], [12]], [[14], [16], [18]]] |
| n | [D0,…Dn] | 4-D | n阶 |
变量
变量存储图的状态12345678910111213141516171819202122232425262728import tensorflow as tf# 创建变量state,并初始化为0state = tf.Variable(0, name="counter")# 创建常量one,值为1one = tf.constant(1)# 加操作new_value = tf.add(state, one)# 赋值 new_value给stateupdate = tf.assign(state, new_value)# 初始化所有变量init_op = tf.global_variables_initializer()# 启动图,执行操作with tf.Session() as sess: # 执行init_op操作 sess.run(init_op) # 打印state初始值 print(sess.run(state)) # 执行更新state的操作,并打印 for _ in range(3): sess.run(update) print(sess.run(state))# output:# 0# 1# 2# 3
sess.run(init_op)之前并没有执行任何操作,所以state为0。sess.run(update)执行操作才会更新state值。
Fetches
用于取出操作的结果。尽量在一次操作运行中取出多个tensor,提高效率。12345678910111213141516import tensorflow as tfinput1 = tf.constant([3.0])input2 = tf.constant([2.0])input3 = tf.constant([5.0])# 加intermed = tf.add(input2, input3)# 乘mul = tf.multiply(input1, intermed)# (input2 + input3) * input1with tf.Session() as sess: result = sess.run([mul, intermed]) print(result)# output:# [array([ 21.], dtype=float32), array([ 7.], dtype=float32)]
Feeds
用于临时保存tensor值,调用方法结束后,feed消失123456789101112import tensorflow as tfinput1 = tf.placeholder(tf.float32)input2 = tf.placeholder(tf.float32)# 乘output = tf.multiply(input1, input2)with tf.Session() as sess: print(sess.run([output], feed_dict={input1:[7.], input2:[2.]}))# 输出:# [array([ 14.], dtype=float32)]
TensorFlow入门
一个使用梯度下降实现线性回归的例子
|
|
终端输出:12345678910110 [ 0.86394864] [-0.13441049]20 [ 0.34454051] [ 0.1738376]40 [ 0.17663138] [ 0.26046464]60 [ 0.12401388] [ 0.28761086]80 [ 0.10752521] [ 0.29611763]100 [ 0.10235816] [ 0.29878339]120 [ 0.10073899] [ 0.29961875]140 [ 0.10023157] [ 0.29988053]160 [ 0.10007257] [ 0.29996258]180 [ 0.10002275] [ 0.29998827]200 [ 0.10000715] [ 0.29999632]
TensorFlow的几个概念
Session:用于执行graph的上下文环境
Graph:计算任务,由许多节点组成
节点:代表不同的操作,被分配到cpu或gpu执行
Variable:变量
TensorFlow分两个阶段,构建阶段和执行阶段
梯度下降
先随机对W赋值,然后改变W的值,使loss按梯度下降的方向进行减少